
It’s essential to understand the reset maintenance light on the Toyota Camry Here are
Some following important steps to reset the light on the Toyota Camry.
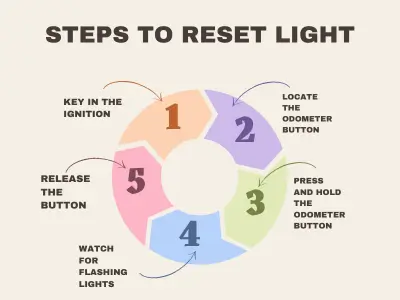
Key in the ignition, position two
Turn the ignition to the “on” position (where dash lights turn on) but don’t start the engine.
Locate the odometer button.
Find the button that controls the trip odometer on your dashboard.
Press and hold the odometer button.
Keep the button pressed.
Watch for flashing maintenance lights.
The maintenance light should flash and/or you may hear a beeping sound.
Release the button, and start the car.
Once the process is complete, you can release the button and start your car. Verify the light is off.
Step-by-step guide to reset light on Toyota Camry
To reset the maintenance light on a Toyota Camry, you’ll need to follow a specific set of steps. This process is relatively straightforward and can be done without the need for any special tools.
By carefully following these instructions, you can successfully reset the maintenance light and ensure your Camry’s system is properly updated.
Step 1: Key in the Ignition, Position Two

Before starting the reset process, ensure that your Toyota Camry is parked safely and the engine is turned off. Insert the key into the ignition and turn it to position two.
This position activates the vehicle’s electrical system, allowing you to access the dashboard lights and other electronic features without starting the engine.
You’ll notice that the dashboard lights, including the warning lights and indicators, illuminate, indicating that the ignition is on.
Step 2: Turn the Ignition to the “On” Position
Once the key is in position two, proceed to turn it further to the “on” position. This is the position just before starting the engine, where the dashboard lights remain on, but the engine itself does not start running.
It’s essential to ensure that the engine remains off during this step to avoid any potential safety hazards associated with starting the vehicle while performing maintenance procedures.
Step 3: Locate the Odometer Button
With the ignition in the “on” position, take a moment to locate the odometer button on your Toyota Camry’s dashboard. This button is typically located near the speedometer or within the instrument cluster, depending on the model year and trim level of your vehicle. The odometer button is used to cycle through various functions and displays related to the vehicle’s mileage, including the trip odometer and overall odometer readings.
Step 4: Press and Hold the Odometer Button
Once you’ve located the odometer button, press and hold it down firmly using your finger or thumb. Keep the button pressed continuously throughout the reset process. Pressing and holding the button is necessary to trigger the reset sequence and initiate the clearing of the maintenance light from the vehicle’s system.
Ensure that you maintain steady pressure on the button to prevent accidental interruption of the reset procedure.
Step 5: Watch for Flashing Maintenance Light
While holding down the odometer button, pay close attention to the maintenance light on the dashboard. As the reset process begins, you may notice that the maintenance light starts to flash intermittently.
Step 6: Release the Button, Start the Car
Once the maintenance light has finished flashing and the reset process is complete, release the odometer button. With the reset successfully executed, proceed to start your Toyota Camry as you normally would.
Turn the key to the position that starts the engine, and verify that the maintenance light is no longer illuminated on the dashboard display.